


OSRS Yama Boss: Complete Guide
Yama is one of the toughest duo encounters added to Old School RuneScape, built to punish mistakes and reward clean execution. Introduced in May 2025, this boss fight is all about coordination, timing, and understanding how each phase works before things spiral out of control. Every stage brings new pressure, from dangerous attack rotations to mechanics that force both players to react fast and stay in sync. Going in unprepared can end a run very quickly, even for experienced PvMers. This guide breaks down everything you need to know before stepping into the fight, including how to prepare properly, what to expect from each phase, and which mechanics you absolutely must respect if you want consistent kills and smoother clears.
Requirements
To face Yama, players must first complete A Kingdom Divided, a Master-tier quest in Old School RuneScape that opens access to the Chasm of Fire, where the encounter takes place. Outside of that quest, there are no hard stat checks preventing entry, but that doesn’t mean the fight is forgiving. Yama is built as a true endgame duo boss, and attempting it without strong preparation is a fast way to burn supplies and fail runs. High combat stats across the board, powerful gear, and prior experience with mechanic-heavy PvM are strongly advised. This is not a boss meant to be brute-forced; success comes from understanding patterns, reacting cleanly, and coordinating well with your partner.
Yama Location in OSRS
Yama can be found inside Yama’s Domain, more commonly known as the Chasm of Fire, a dangerous dungeon tucked away in the north-western part of Shayzien in Old School RuneScape. This area is packed with high-level demons and serves as Yama’s stronghold, so expect hostile enemies on the way in.
There are several convenient ways to reach the Chasm of Fire, depending on what unlocks you have:
• Fairy Ring (DJR) – Drops you just south-east of the Chasm and is one of the fastest routes, provided you’ve already unlocked Great Kourend travel.
• Kharedst’s Memoirs – Use the History and Hearsay reminiscence to teleport to the Graveyard of Heroes, then travel north. This requires Tale of the Righteous to be completed.
• Battlefront Teleport – Places you north-west of the Chasm and offers a fairly direct run to the entrance.
• Skills Necklace – Teleport to the Farming Guild and run south-east toward the Chasm; bringing antipoison is recommended due to lizardmen along the path.
Once inside, follow the dungeon path deeper until you reach Yama’s Domain. From there, proper gear, supplies, and coordination become far more important than the journey itself.
Gear Recommendations for Yama
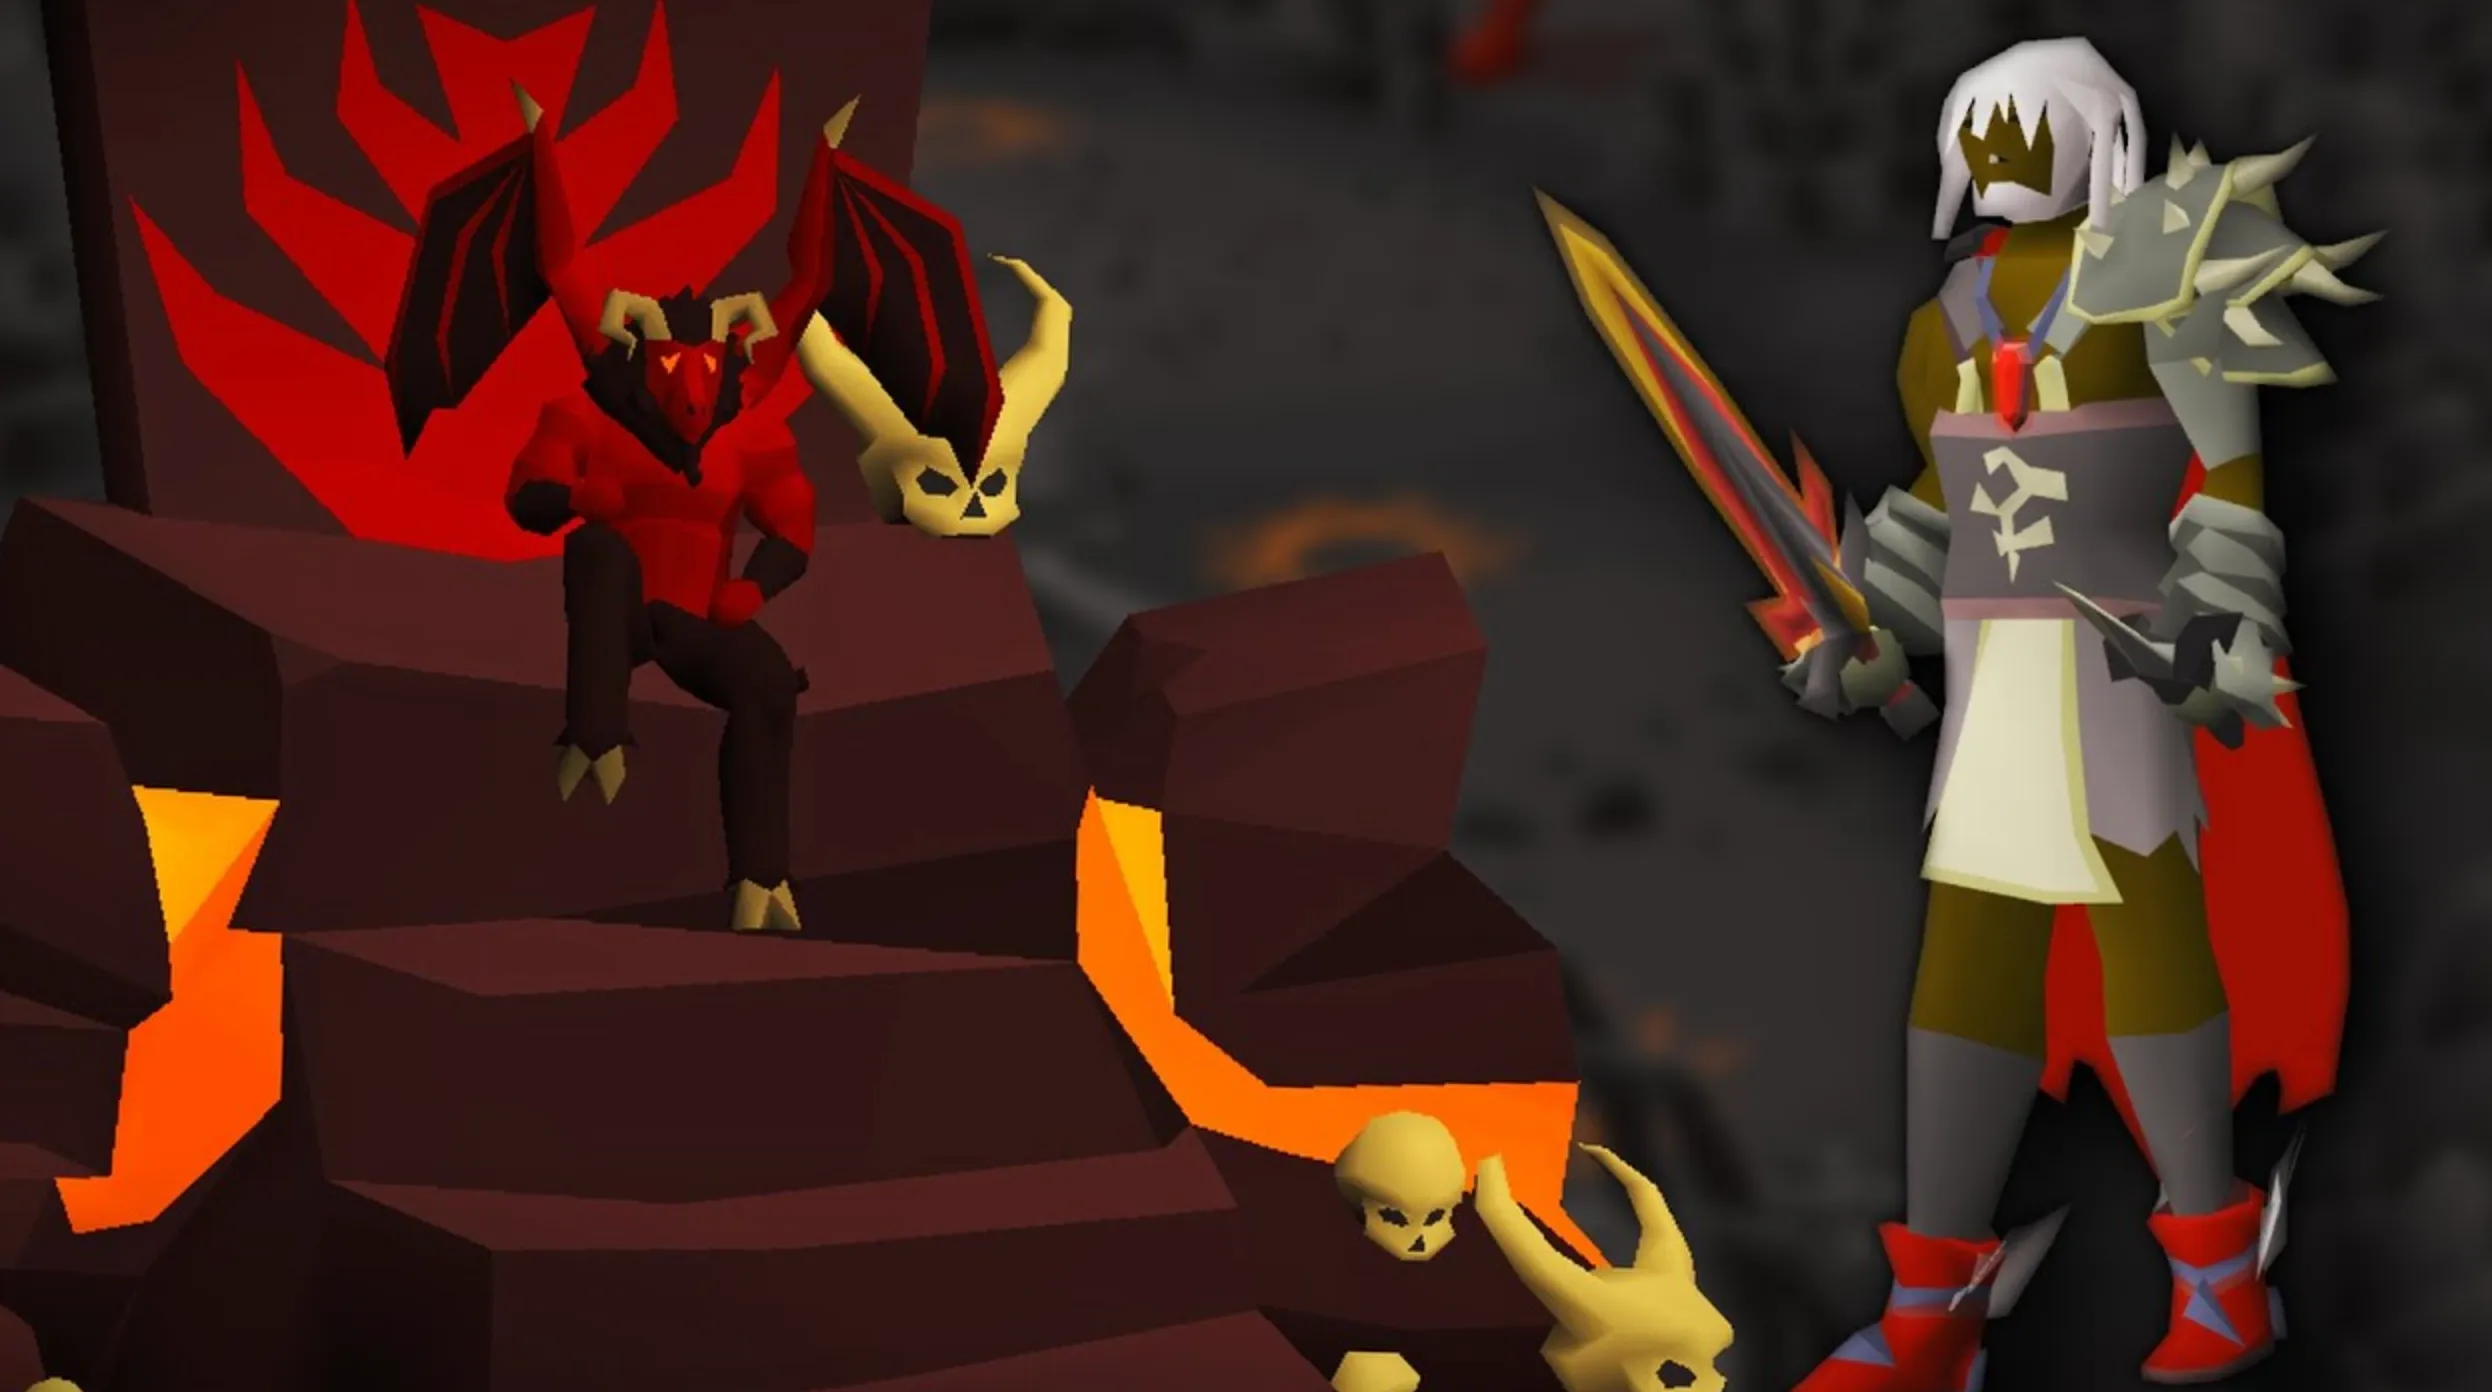
Your loadout plays a huge role in how smooth the Yama fight feels, so coming in properly geared makes a massive difference. The strongest setup revolves around Tumeken’s Shadow paired with full Ancestral robes, which gives you the best possible magic damage and accuracy for most phases. If you’re missing the Ancestral hat, a Torva full helm works well as a temporary replacement without hurting your overall performance too much.
It’s also important to bring at least one weapon switch, ideally a melee setup. Certain parts of the fight favor melee damage, and having that option available prevents unnecessary downtime or slower phases. For utility, the Purging Staff is extremely useful later in the encounter, as its special attack deals with spawned cores far more efficiently than standard weapons.
While not mandatory, opening the fight with a Bandos Godsword special attack can help by lowering Yama’s Defence, giving you slightly faster early damage. Finally, make sure to pack a Sanfew serum or Antidote. Yama applies heavy poison effects similar to Zamorak-based attacks, and ignoring it can quickly drain your supplies and end the run early. Proper gear and smart preparation turn this fight from overwhelming into controlled and repeatable.
Yama Fight Mechanics Explained
Yama is built around a layered, multi-stage encounter where positioning, awareness, and timing matter just as much as raw damage. Each phase introduces its own rules, and missing even one mechanic can quickly snowball into a failed run. Learning how these phases flow together is the key to consistent kills.
Opening Phase – Glyph Management
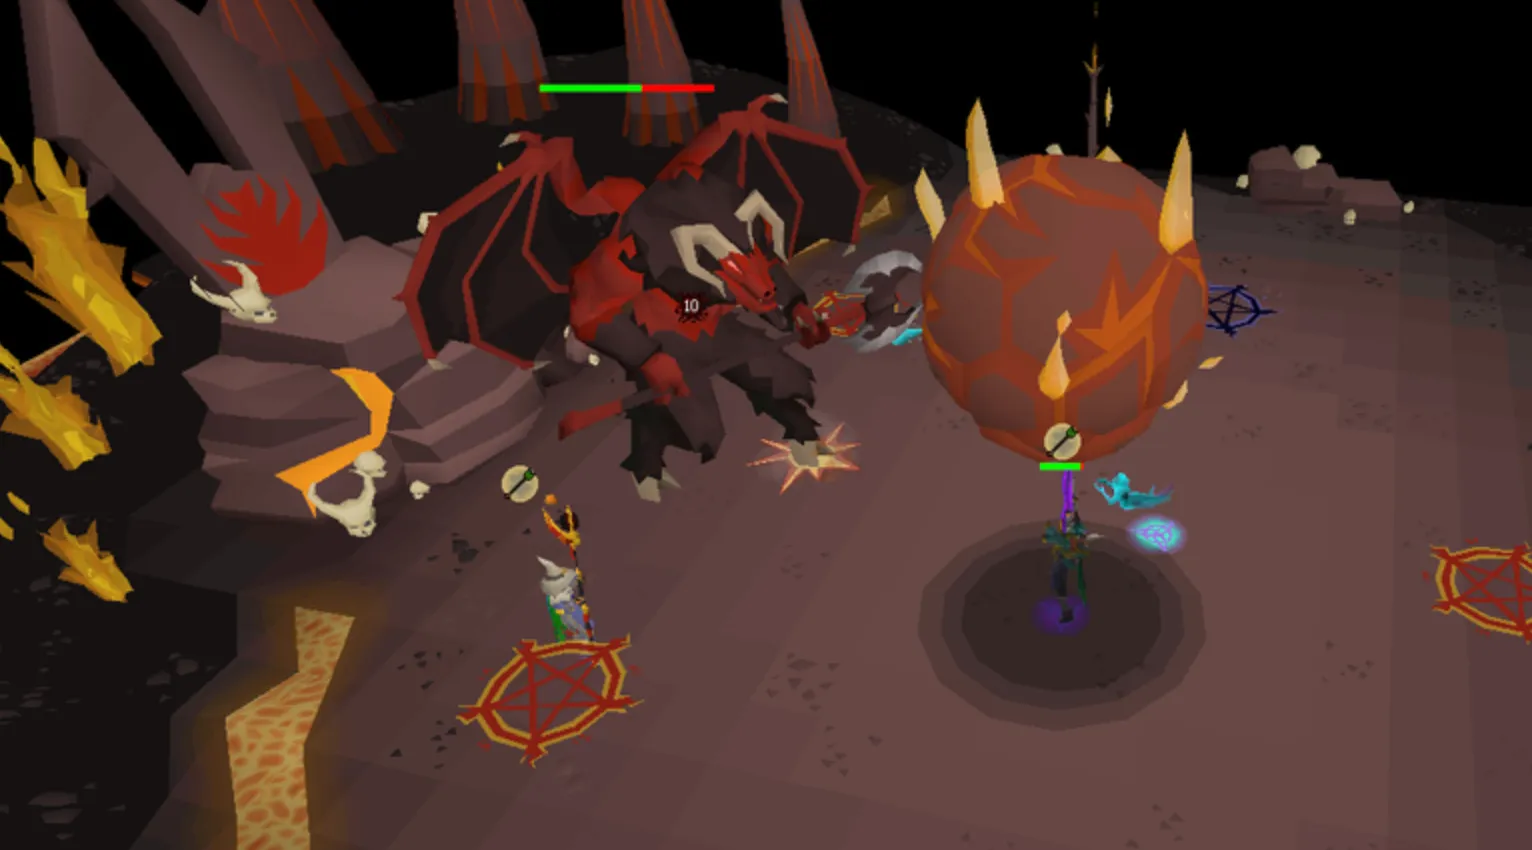
At the start of the fight, the arena spawns two types of floor symbols: one set glowing in orange-red tones and another in dark purple-black. Yama cycles between magic and ranged attacks, and after each hit, players must step onto the matching glyph to negate follow-up damage. Magic attacks require stepping on the orange glyphs, while ranged attacks require the dark ones. In duo fights, only one player needs to stand on the correct glyph for both players to be protected, making coordination extremely important. Yama’s opening attack type is determined by whichever glyph color appears more frequently in the room.
Core Attack Patterns
Throughout the fight, Yama mixes standard attacks with visual cues. When he snaps his fingers, the animation tells you what’s coming next. Shadow-filled visuals signal a ranged attack, while fiery effects indicate magic damage. One of his more dangerous patterns is the flame wall, which forces players to time their movement perfectly. Running through it too early or too late results in heavy damage and temporarily disabled prayers, so patience here is critical.
Teleport Intermission (66% and 30% HP)
When Yama drops to specific health thresholds, he forcibly teleports players into a narrow challenge area. Here, you’ll face the Judge of Yama while crossing stepping stones and dodging incoming fireballs. Movement accuracy is everything in this phase. Once you reach the Judge’s platform, it begins launching targeted area attacks that punish slow reactions and poor positioning.
Void Flares Phase
One of the most dangerous moments in the fight occurs when Yama summons Void Flares. These enemies must be destroyed quickly before their countdown ends. Failing to do so heals Yama and deals damage to players at the same time. This is where the Purging Staff becomes extremely valuable, as its special attack massively increases cast speed against the flares, allowing teams to clear them before they become a problem.
Final Enrage Phase
As Yama reaches low health, he enters an enraged state. His defensive stats spike heavily, especially against magic, making kills slower if you don’t adjust properly. During this phase, he fires three connected fireballs in a straight line. The outer projectiles expand outward in an hourglass shape, and the only safe response is to move sideways across the attack path. Standing still or stepping backward almost always results in taking damage.
Mastering Yama isn’t about rushing damage—it’s about respecting each phase and reacting correctly. Once these mechanics become second nature, the fight becomes far more controlled and repeatable, even at higher kill speeds.
Yama Loot Table and Rewards Overview
Yama isn’t just a mechanical challenge—it’s also a boss that rewards persistence with genuinely valuable drops. Whether you’re farming for profit or chasing rare cosmetics, every kill carries meaningful upside. The highlight for many players is the Yami pet, an extremely rare drop that serves as a clear flex and proof of mastery over one of OSRS’s toughest encounters.
From a money-making perspective, Yama shines thanks to the Oathplate armour set, which remains highly desirable due to both its power and rarity. Instead of dropping only full pieces, Yama can also drop Oathplate shards in bulk, giving more consistent progress toward valuable gear even when you don’t hit a jackpot. On top of that, uniques like the Soulflame horn and Dossier (Yama) add even more long-term value for dedicated grinders.
Here’s a simplified look at the most notable rewards:
• Oathplate shards (4–12) – fairly common and a steady source of value
• Forgotten lockbox – contains useful and profitable loot
• Dossier (Yama) – unique collection item tied to the boss
• Soulflame horn – rare and highly valuable unique
• Oathplate helm, chest, and legs – rare armour drops with high demand
• Yami pet – extremely rare cosmetic reward
Beyond uniques, Yama’s standard loot pool is strong enough to keep trips profitable on its own. Expect regular drops like high-tier combat potions, quality food supplies, valuable runes, and useful crafting materials. These consistent rewards help offset supply costs and make extended grind sessions feel worthwhile even without rare drops.
Overall, Yama offers a solid balance between reliable income and high-impact rares, making it a boss that rewards both patience and skill.
Conclusion
Yama stands out as one of the most demanding and rewarding boss fights in Old School RuneScape, pushing players to master positioning, teamwork, and reaction timing across multiple phases. From preparing the right gear and learning the arena mechanics to handling teleport phases, Void Flares, and the enraged finale, every part of the encounter tests both knowledge and execution. For players willing to put in the effort, Yama offers more than just a challenge—it provides strong profit potential, prestigious uniques, and one of the most impressive pets in the game. With proper preparation and a clear understanding of the mechanics, Yama becomes a consistent and satisfying boss to farm, making it a worthwhile goal for any endgame PvM-focused account.
Posted On: January 11th, 2026
Recent Articles


💬 Need help?
Our 1v9 support team is available 24/7 to help you with any questions or issues you may have.
support@1v9.gg
Loading...
1v9.gg is not endorsed or affiliated by any game developers or publishers.
2025 1v9, All Rights Reserved, Created By NightDev