


Emre Hero Overwatch: Complete Guide
Emre is a high-tempo damage hero built around aggression, precision, and smart positioning. Enhanced with advanced cybernetics and aligned with Talon, he plays like a frontline skirmisher who thrives on fast engagements and punishing mistakes. If you enjoy pressuring enemies, taking sharp off-angles, and snowballing momentum, Emre is a hero that rewards confident decision-making.
His kit revolves around burst damage and sustain through combat. Emre can apply heavy pressure in short windows, especially when catching opponents out of position. When played correctly, he can swing team fights quickly by eliminating key targets before they have time to react. However, poor timing or reckless aggression will get you punished just as fast.
Success with Emre depends on understanding when to peek, when to commit, and when to disengage. He excels at controlling sightlines, forcing cooldowns, and capitalizing on weakened enemies. In chaotic modes like Mayhem, his ability to chain pressure and survive through damage makes him especially dangerous.
In this guide, we’ll break down how to use Emre’s abilities effectively, manage positioning, maximize damage output, and turn small advantages into full team fight wins. If you want to master an aggressive DPS hero who can take over games with the right execution, Emre is a strong pick to learn.
Emre Abilities Breakdown
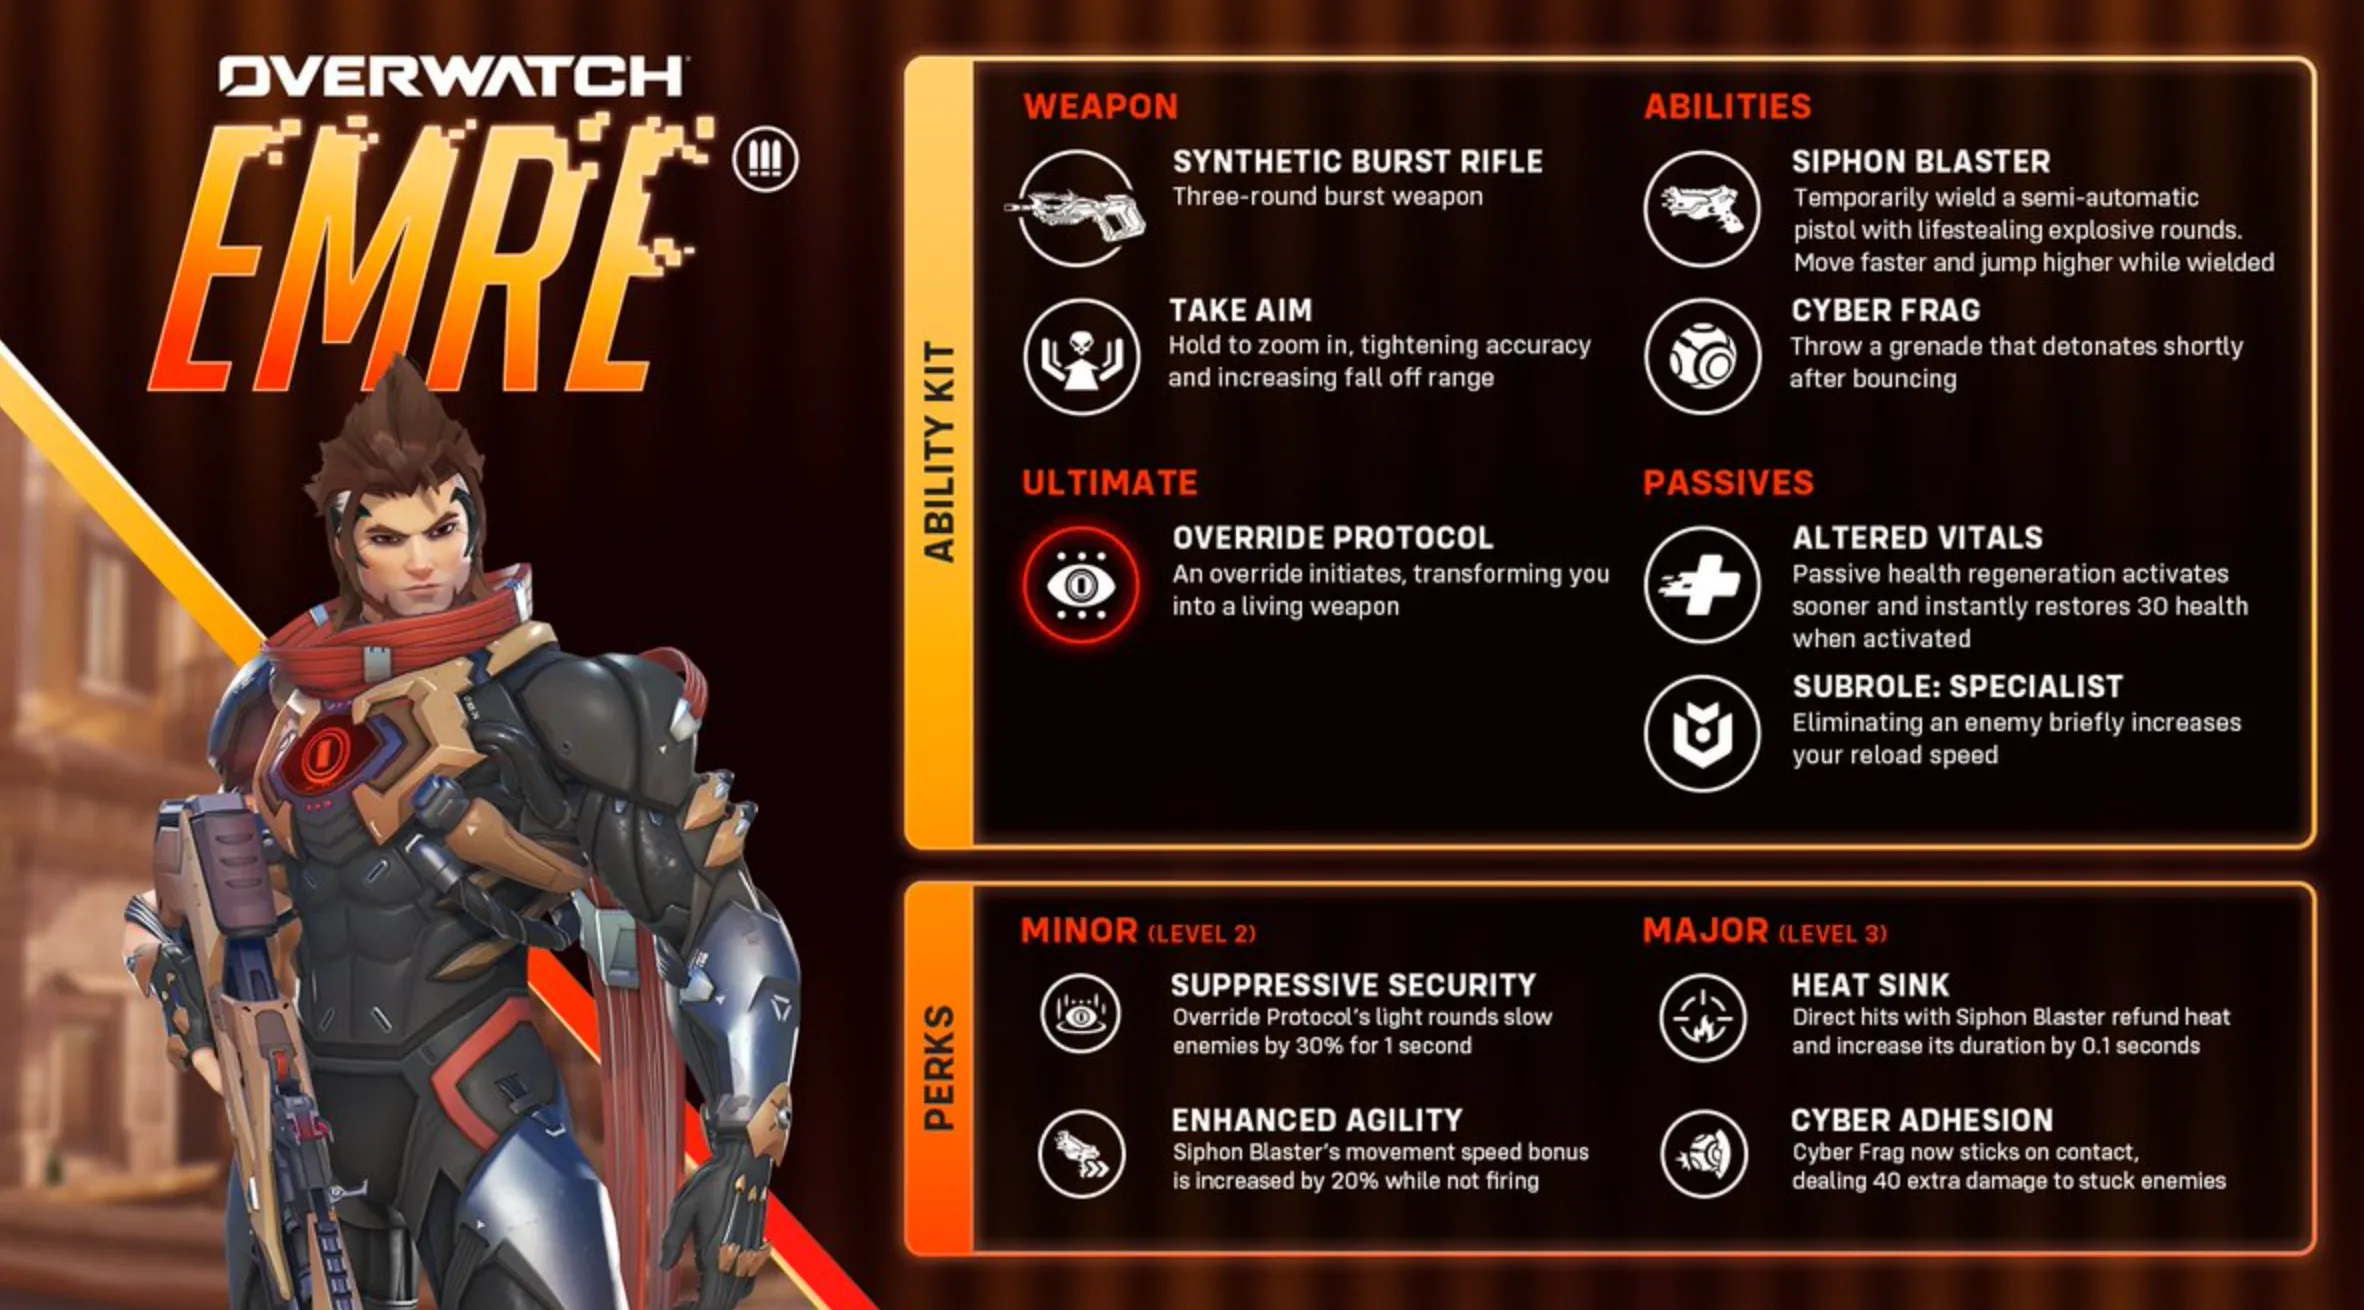
Understanding Emre’s toolkit is the key to getting real value out of him. He’s not just about raw aim — he’s about knowing when to poke, when to push, and when to disengage. Here’s how each part of his kit works and how you should think about using it.
Synthetic Burst Rifle
Emre’s main weapon fires controlled three-shot bursts instead of a continuous spray. It shines at mid-range, where you can consistently land full bursts without being forced into close-range chaos. Since it’s not automatic, this weapon rewards strong crosshair placement more than wild tracking. If you’re lining up your aim at head level before peeking, you’ll delete targets much faster. The goal isn’t just to hit — it’s to connect all three shots per burst, ideally with at least one landing as a headshot.
Take Aim
Take Aim lets Emre zoom in for tighter accuracy and improved effective range. This is your tool for holding angles, contesting longer sightlines, or punishing enemies crossing open space. It’s strongest when used from safe, stable positions. If you’re getting dove or heavily pressured, don’t tunnel vision on zoom — reposition first. Think of it as a precision tool, not something you spam mid-brawl.
Siphon Blaster
This ability temporarily swaps your rifle for a semi-automatic sidearm that fires explosive rounds and steals life from enemies. While it’s active, Emre gains extra movement speed and jump height, turning him into a more mobile duelist. This is your aggressive window. Use it when pushing isolated targets or finishing low-health enemies. The added mobility makes it easier to chase or reposition quickly, and the life steal helps you survive risky engagements.
Cyber Frag
Cyber Frag is a bouncing grenade that explodes shortly after landing. It’s perfect for flushing enemies out of cover, damaging grouped opponents, or securing eliminations on targets trying to escape. The bounce mechanic gives it more flexibility than a standard straight-throw projectile. You can bank it around corners or into tight areas to force movement. Good grenade placement often forces cooldowns, which creates openings for your team.
Override Protocol (Ultimate)
When Emre activates his ultimate, he launches upward and becomes a serious damage threat. While airborne, he can fire rapid explosive shots for sustained pressure or charge up stronger blasts to deal heavy burst damage. The rapid-fire mode is great in close fights where multiple enemies are stacked. Charged shots, on the other hand, are ideal for picking off key targets or breaking clustered teams. Timing matters here — don’t use it when enemies can easily hide or disengage. Pop it when they’re committed.
Altered Vitals (Passive)
Emre’s passive allows his health regeneration to start faster after leaving combat and immediately restores a chunk of health when it triggers. This gives him strong self-sustain if he knows how to reset properly. Instead of staying in a losing duel, take a quick step back, let the passive activate, and re-engage. Smart disengages make Emre much harder to eliminate over the course of a fight.
When you combine these abilities correctly, Emre becomes a flexible damage hero who can poke safely, dive aggressively, and recover quickly. Mastering the rhythm between pressure and retreat is what separates average players from truly dangerous Emre mains.
Tips for Playing Emre
If you want consistent value with Emre, you need to think about spacing first. He performs best at mid-range, where he can land full burst shots without getting overwhelmed. Play around natural cover, peek quickly, fire a controlled burst, then step back. Long, open duels in the middle of the map usually don’t favor him, especially against heroes who can out-sustain or out-range you.
When holding angles or defending objectives, activate Take Aim before the fight fully explodes. This lets you land early damage and potentially force cooldowns before the enemy even commits. Early pressure is huge. However, don’t get stuck zoomed in. If someone dives you or chaos breaks out around you, cancel it immediately and reposition. Awareness matters more than raw accuracy in those moments.
Siphon Blaster should feel like a decision, not a random button press. When you switch to it, you’re saying, “I’m committing.” Use it to chase isolated targets, win close duels, or reposition aggressively with the extra movement. The life steal only helps if you’re landing shots, so don’t activate it blindly. Pick your target, commit with confidence, and finish the fight quickly.
Cyber Frag is strongest when enemies are grouped or stuck in tight areas. Throw it into choke points, around corners, or onto targets you’ve already damaged. It works especially well right after landing a clean burst, forcing enemies to either take the explosion or move into a worse position. Smart grenade timing can create openings your team can capitalize on immediately.
Override Protocol can completely swing a team fight, but only if you use it at the right moment. Before activating, make sure you’re not exposed or already low health. You become a major focus target the second you go airborne. Use the rapid explosive shots when enemies are stacked or pushing aggressively. Switch to charged blasts if you need to eliminate a priority target at range. The ultimate is strongest when your team is ready to follow up — communication and timing make all the difference.
At the end of the day, Emre is about controlled aggression. Apply pressure, back off when needed, and re-engage with intention. If you master that rhythm, you’ll consistently win fights without throwing your life away unnecessarily.
How To Counter Emre in Overwatch
To counter Emre in Overwatch, you need to punish his mid-range comfort zone and deny his reset windows. Emre thrives when he can peek safely, land controlled bursts, and disengage to trigger his passive healing. The key is either forcing him into close-range chaos or outranging him so he never gets stable angles.
Dive heroes are very strong against him. Fast tanks and flankers that can collapse on his position make it difficult for him to sit back and use Take Aim. When pressured up close, his burst rifle loses consistency, and he’s forced to either panic-use Siphon Blaster or retreat. Coordinated dives that hit him from multiple angles prevent him from lifestealing enough to survive.
Long-range pressure also works well. Hitscan heroes or snipers that outrange his effective burst window can force him off angles before he gets value. If you consistently break his sightlines, he becomes much less impactful. Don’t give him free peeks.
When he activates Siphon Blaster, avoid isolated 1v1 duels unless you have clear advantage. His mobility and life steal are strongest in those moments. Instead, disengage briefly or focus fire with teammates so he cannot sustain through damage.
Against Override Protocol (his ultimate), spread out immediately. Grouped teams are easy targets for his explosive shots. Use cover to break line of sight, and pressure him while he’s airborne since he becomes a priority target. Defensive ultimates or burst damage can shut him down quickly before he secures eliminations.
Overall, the best way to counter Emre is to deny him controlled mid-range fights. Force him to react instead of letting him dictate the tempo, and he becomes far less threatening.
Conclusion
Emre is a high-pressure damage hero who rewards smart positioning, clean aim, and disciplined aggression. He isn’t about running in blindly or holding down the trigger — he’s about controlled bursts, smart peeks, and knowing exactly when to commit. If you manage your spacing well and rotate between poke, pressure, and disengage properly, Emre can consistently take over fights.
His strength comes from balance. He can pressure at mid-range, duel up close with the right timing, and completely swing team fights with a well-placed ultimate. But like any aggressive hero, poor positioning or wasted cooldowns will get punished fast. That’s why mastering Emre is less about mechanics alone and more about decision-making.
If you focus on landing full bursts, using Siphon Blaster with intention, and timing Override Protocol when your team can follow up, Emre becomes one of the most impactful DPS picks in Overwatch. Play him with confidence, but always with control — that’s how you turn pressure into wins.
Posted On: February 20th, 2026
Recent Articles

💬 Need help?
Our 1v9 support team is available 24/7 to help you with any questions or issues you may have.
support@1v9.gg
Loading...
1v9.gg is not endorsed or affiliated by any game developers or publishers.
2025 1v9, All Rights Reserved, Created By NightDev